Connect to Your Database with the Database Connection Wizard
The Database Connection Wizard enables you to connect to tables, views, stored procedures, and table functions.
You can use the wizard for initial connections and to reconnect later. The add-in also leverages the wizard in other scenarios, such as configuring connections or query parameters.
The wizard inserts Excel tables and creates the necessary infrastructure to save changes. Use it to connect when your current tables have the Save button disabled.
You can connect to SQL Server, Azure SQL Database, Oracle Database, PostgreSQL, MySQL, MariaDB, Snowflake, and SQLite.
The wizard consists of the following steps:
- Selecting a provider
- Connecting to a database
- Selecting an object to connect
- Customizing a query
- Inserting a data table into Microsoft Excel
Step 1. Selecting Provider
Select the desired data provider as outlined in the Database Connections topic.
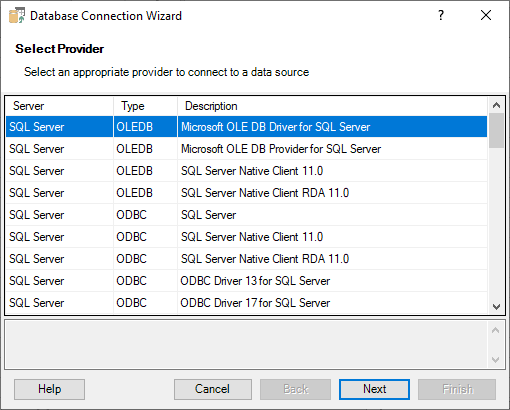
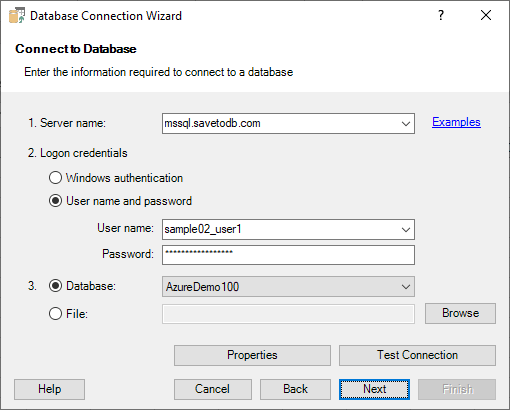
Step 2. Connecting to Database
Connect to a database as described in the Database Connections topic.
Step 3. Selecting Object to Connect
In this step, select an object to connect and configure its properties.
Here’s a sample page:
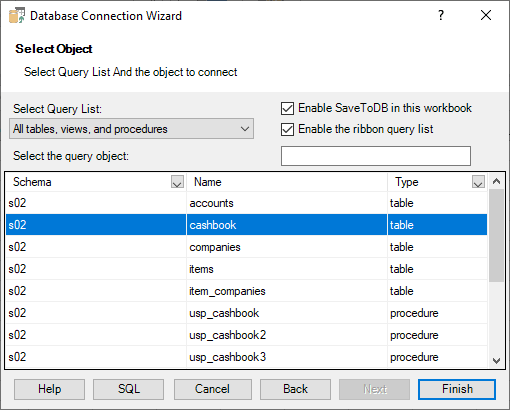
Important Notes on Page Controls:
- Query List
- The query list displays objects available for connection.
The default list, All tables, views, and stored procedures, includes all objects.
You can select a database schema to filter the list.
Database developers can customize query lists to show only specific objects. - Enable SaveToDB in this workbook
- Check this box to enable advanced SaveToDB features, such as saving changes.
The add-in will add hidden worksheets to store the necessary metadata.
This checkbox is disabled if the workbook already contains the required worksheets. - Enable the ribbon query list
- Check this box to allow connections to new objects using the ribbon query list.
- SQL
- Use this button to customize an SQL query.
You can also use the textbox under the Enable the ribbon query list checkbox to filter objects by typing several characters.
Step 4. Customizing Query
When connecting to tables and views, this step allows you to configure fields for selection and use as WHERE filters.
For example:
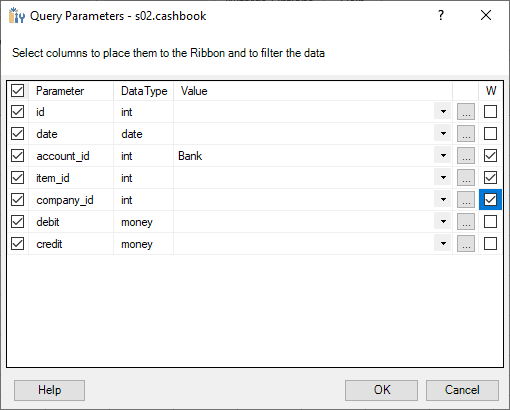
Check the fields you want to select in the leftmost column.
Check the fields you want to use as WHERE filters in the rightmost W (Where) column.
The add-in places these fields on the ribbon for easy data filtering.
You can use the button with three dots to select multiple values, which builds the WHERE ... IN clause.
When connecting to stored procedures or table functions, the wizard displays parameters.
For example:
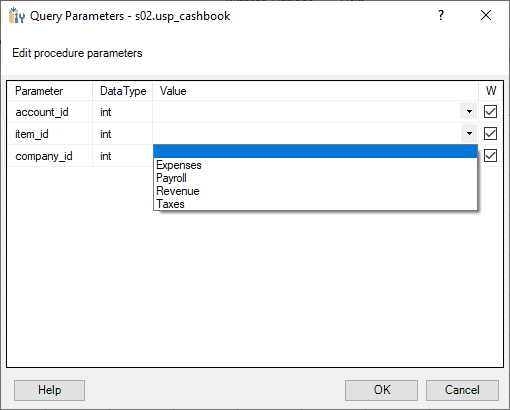
Check the parameters you want on the ribbon in the rightmost W (Where) column.
You can set parameter values here.
Use the button with three dots to edit a parameter value list. This option is unavailable if developers have preconfigured parameter values.
Step 5. Inserting Query
If you started the wizard from an existing table, it inserts the new query in place. This feature is useful for reconnecting existing queries, such as restoring the source query column order.
Otherwise, the wizard prompts you for an address to insert a table. We recommend starting the insertion at cell B3 to use the row above the table for changing filters.
Take a look at the screenshot:
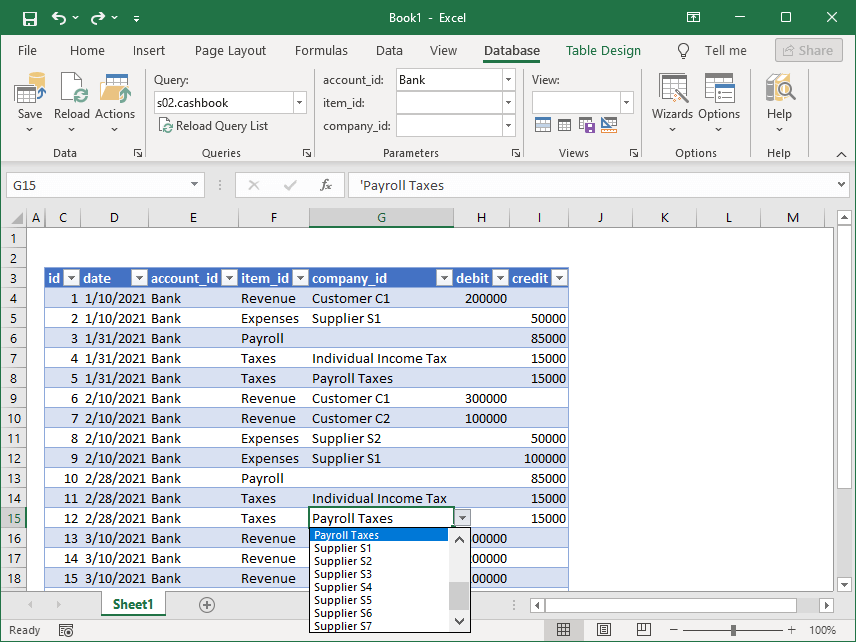
The screenshot shows the Database tab with the following features:
- Use the Save button to save changes (if the object supports it).
- Use the Reload button to refresh data.
- Use the Query list to connect to new objects.
- Use the ribbon Parameters to change query parameters.
- Use the View list to change table views.
When you connect to an object for the first time, the add-in attempts to load the Excel table format, including table views from the database. If it can't find the format, it applies the default formatting.
For more details, see the Table Format Wizard and Options Dialog Box articles.
When you reconnect to an object, the add-in applies the previously used format.